A site for solving at least some of your technical problems...

Rescuing an SSD drive with ddrescue
Submitted by Alexis Wilke on Wed, 03/26/2025 - 18:32
Introduction
I thought I missed one directory tree from a drive that is breaking down. So I started working on rescuing the drive. This is the first time I do so. Before, I always have had backups as required. (Well except ones with an SGI Indy computer, my 4Gb hard drive went bust and I had no copies... luckily a colleague did so it took a couple days, but I was able to get back up and running. That was a long time ago.)
| WARNING: |
I strongly suggest that you read the entire page here and probably a lot of the ddrescue documentation BEFORE you start the rescue. Your case is probably different from mine and other people. There are many reasons why you would do one thing or another and many of the points below will give you very important hints. |
Rescuing Data from a Storage Device
Looking around, the only tool I could find that would do exactly that is ddrescue. A GNU utility specifically designed to read as much data as possible from a device and writing it to either another device or a file.
The tool reads blocks, or even sectors if it has trouble reading entire blocks, from the start to the end of the device. Then from the end back to the start for any block it missed the first time.
In a standard processing of your device, ddrescue will do five passes and then stop. It on purpose does NOT retry reading blocks over and over again until it works, because most of the time that would not actually work. In fact, if you read from an SSD, it is very unlikely to work. What you want to do is even worth than that: as soon as it fails, stop ddrescue, turn off the computer for a while, and then restart the process. It is very likely to work better that way than waiting around because the drive system is likely to prevent any further reads.
Rescuing to a File
| WARNING: | See the section about the domain map first, if you can get such, it will most certainly save you a lot of time. |
I knew that my boot drive was used at a rather small percent, maybe 37%. I mainly had the OS, the /boot partition, a few extra things like development files installed by debian (i.e. in /usr/include and such). So I decided to save that to file since that way it would make it much smaller on disk by using the --sparse option (i.e. all the unallocated blocks will not be saved in the destination file).
$ sudo ddrescue \
        --sparse \
        /dev/sdXY \
        disk.img \
        disk.map
The command takes two or three parameters. However, you always want to use a map, so you really want to consider using three parameters:
- /dev/sdXY — the source device; this can be a hard drive, an SSD, a storage stick, a CD/DVD, or a USB thumb drive... pretty much any storage that is detected by the OS
WARNINGS:
a) this device should NOT be mounted an any point in time from the moment you detect that there is an issue with your storage device
b) do not ever run fsck or other similar tool on your defective drive until after your are 100% sure you successfully backed up all your data; writing anything to a defective drive can end up completely destroying it
c) remember that most tools do not read the data on a per block or sector basis; they 100% rely on the kernel to read the files; don't attempt a backup with a tool that requires mounting the device, even in read-only mode
- disk.img — the output file where the device data is going to be stored; this file can end up being really large—i.e. as large as the device you are trying to rescue—so make sure you have a drive that will support such a large file; as mentioned above, if you use the --sparse command line option, the file footprint should be smaller than the input drive; however, this assumes the drive was not used so much that all blocks have data by now (even if not referenced); so a 1Tb input device requires at least 1Tb output drive + extra for the inodes and such... so think of it as: "I need about 1.5Tb of disk space to save my drive's image"
- disk.map — the data used by ddrescue to know what to do next, especially when in need of quitting and restarting
WARNINGS:
a) when stopping ddrescue, hit Ctrl-C once; that will give ddrescue a chance to actually save the data it has in memory to the map; this is because it does not constantly keep the map up to date to avoid many unnecessary writes
b) if you change your setup, as in disconnect the drives and reconnect them in a different way (i.e. hardware changes); then the existing map will not be used properly unless first edited (it's a text file) and the device name updated; this happened to me and the transfer restarted from scratch, which is not so good (i.e. it stopped 100Gb sooner on the second attempt!)
Quitting with Errors
If ddrescue went through the entire process but still shows a large number of missing blocks, then you probably want to try again. For that purpose, you need to use the --retrim command line option.
Here is an example of output which shows 169GB of data that was not rescued:
GNU ddrescue 1.19
Press Ctrl-C to interrupt
Initial status (read from logfile)
rescued:   723013 MB,  errsize:    169 GB,  errors:       8

Current status
rescued:   723013 MB,  errsize:    169 GB,  current rate:        0 B/s
   ipos:   233114 MB,   errors:       8,    average rate:     1314 B/s
   opos:   233114 MB, run time:    1.35 m,  successful read:      22 s ago
Finished
And at the bottom we see the word "Finished". This means ddrescue went through all the passes it was going to go through and decided to stop work.
So you use the same command as above, plus the --retrim like so:
$ sudo ddrescue \
        --retrim \
        --sparse \
        /dev/sdXY \
        disk.img \
        disk.map
Do not use the --domain-mapfile for this purpose or ddrescue will re-read the blocks it was already able to read!
Rescuing an SSD Device
 In my case, my failing drive was an SSD. I have had experiences with several USB thumb drives and one other SSD drive where, once you start getting errors, the whole thing fails forever after that. Interestingly enough, it is often possible to turn off everything and then restarting the computer and scrape some more data.
The first time, I let it go for a while, but even after 35 min. the read was constantly at 0 B/s. So totally useless. That is, I'd bet that it would have gone to the end of the drive and do absolutely nothing. So I hit Ctrl-C and then turned off the computer. After a couple of hours, I tried again. It read 5Gb of data. Tried again, it read 35Gb. Next time, it read the rest of the drive, some 600Gb.
Note that the rather long pauses are because I had other work to do, but also that allows the drive to cool down. Yes. It's an SSD, it doesn't get super hot, but it does like any electronics. So cooling is important and it takes time.
| IMPORTANT NOTE: | There are posts out there that will tell you not to use ddrescue to work on an SSD device or similar. Note that ddrescue is not going to write to the device, The most likely reason for those warnings is the aging of the drive because of writes, not because of reads. It will work as much as it can. If you really need the data, (1) you should have done backups, and (2) you can straight away go to a professional service which is not unlikely to use ddrescue on your drive... |
Rescuing to Another Device
Instead of rescuing to a file, you can instead specify another device.
You just have to use /dev/sdXY for the output. Obviously, you want to make sure that the destination device is the exact same size of the input or larger. However, larger can also cause issues, but I think it should work just fine (I did not try...)
One thing to keep in mind, the ggrescue documentation also mentions it, the destination does not get cleared before the copy starts. If you have no issues copying all the input data, you'll be good. If errors occur, however, the corresponding blocks in the destination will be untouched. To make sure that you get a system that you can work with, you should first clear the output.
I would suggest using the dd command for that process. Something like this:
$ dd if=/dev/zero of=/dev/sdXY
You may want to use the count=... option to limit the copy to the total number of blocks. Without that option, it will stop the copy with an error once it reaches the end. Keep in mind that count=... is in number of blocks, not bytes although you can define the size of a block of 1 byte, but that's not a good idea. If anything, make the size of the blocks larger, not smaller.
Using a Domain Map
ddrescue makes use of a map to determine what block to rescue next. By default, a fresh map includes all blocks, from 0 to N, where N is the drive or partition size divided by the size of a block.
There are tools that can be used to generate a domain map before you start the recovery. Namely, I tried to run partclone like so:
$ sudo partclone.ext4 --source /dev/sdXY --domain --output domain.map
Partclone v0.2.86 http://partclone.org
Starting to map device (/dev/sdXY) to domain log (domain.map)
extfsclone.c: FS contains a file system with errors
Partclone fail, please check /var/log/partclone.log !
Except that, as you can see, in my case it failed with a "bad file system" error. So I could not get a domain map. If you are in the same boat, your only option is to do like me: scan the entire drive.
If on the other hand you were able to extract a domain.map file, use it the first time you run ddrescue (at least, from what I understand, you should only use it once; the data will be used to generate the disk.map and then you can just reuse the disk.map for additional runs).
$ sudo ddrescue \
        --domain-mapfile=domain.map \
        --sparse \
        /dev/sdXY \
        disk.img \
        disk.map
Note that if you suspect at all that the disk map may be corrupted, then you should not use that feature. As above, I did not tell you, well just run fsck on your drive and try again. The drive is going bad, do not write anything, especially not a ton of inodes and maps as fsck does on a damaged disk.
What can of speed improvement can you expect? If you used about 30% of your storage device, then it will take 30% of the time it would otherwise take to scan your entire drive. So in this case, about 3 times faster. This is a really good thing, especially if you end up not reading parts of the drive that are damaged (although the kernel might do that under your feet—if you think that could be happening, using the --idirect command line option of ddrescue).
Errors on Destination Drive
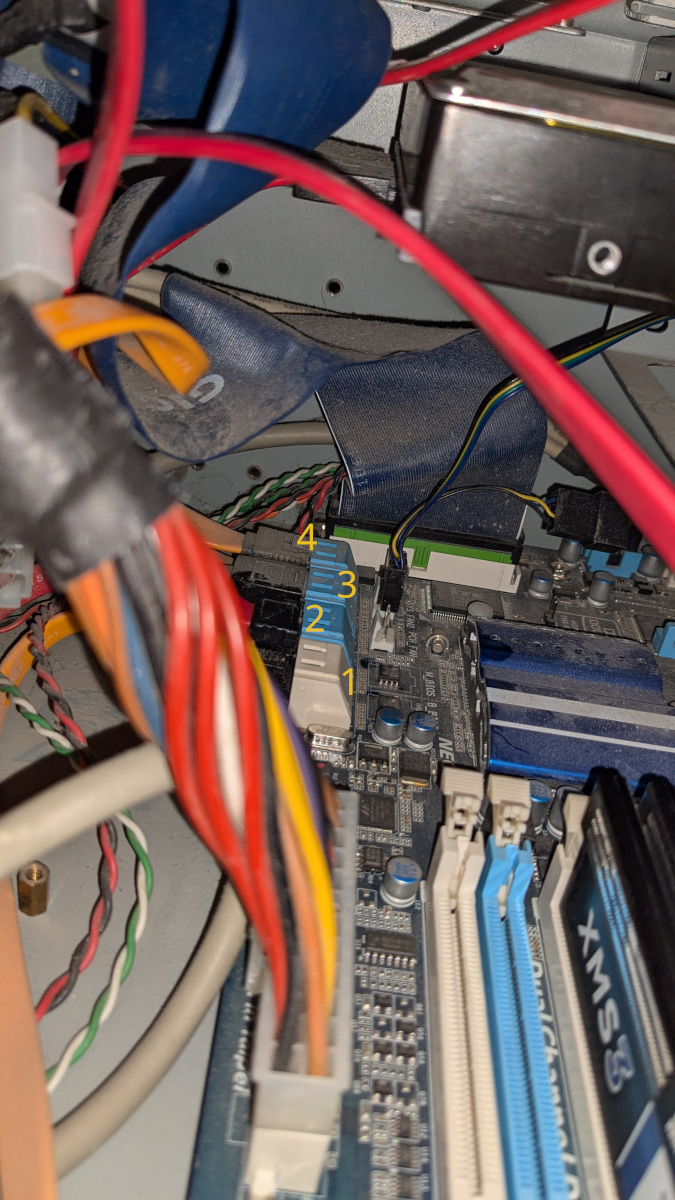 With the old computer I used to do the rescue (my main computer is running a server, so no space there to attempt rescues that could take days...) I connected both drives, IN and OUT on the same dual SATA III port.
Whenever errors started to happen on the source drive, the destination drive also started failing, seemingly. I could not see the data on the destination. To fix the issue, I had to turn off the computer and turn it back on. Then the data on the destination was 100% there. Absolutely no issues.
So, if you can, use completely separate SATA III ports. Preferably, have the failing disk on its very own channel, that way, it won't affect anything else in your computer.
Mounting the Result
The result should not be on a safe partition or in a file and it is probably time to mount it to check out the content. That would require a folder to mount against and the following command:
$ mkdir mnt
$ sudo mount disk.img mnt

# or for a device
$ sudo mount /dev/sdXY mnt
If you had issues with the disk, it's not unlikely that it will be dirty and that will fail when you try to mount it. In that case, you'll want to run fsck against the file or device.
If you have a file and sufficient space, I suggest you make a copy so you can try various parameters:
$ sudo fsck.ext4 -p -f disk.img
The -p is used to run fsck on its own. Don't use that option if you want to "control" what gets fixed, but frankly, you're unlikely to know and not fixing won't help much if at all.
Once fsck ends, try to mount again. This time it should work.
Wrong File Size
In my case, somehow, ddrescue finished the rescue, but the output file was one block too short. So I had to enlarge the file size for the fsck + mount work as expected.
$ ls -l monster-root.image
-rw-r--r-- 1 alexis alexis 892829957632 Mar 26 16:09 disk.img
$ expr 892829957632 + 4096
$ truncate --size=892829961728 disk.img
The truncate added one empty block (4096 bytes of zeroes, in a sparse file, it just changes the size).
Can I Use ddrescue to do Backups?
Yes. Some people do that. It is possible to backup your entire device to another device or a file. In most likelihood, that will be very slow and really only useful for a boot drive where you would like to save the boot sector. (It's really two sectors on PCs and has been for like a very long time).
If you just want to make backups, then there are tools especially deviced for that purpose. In most cases, a good rsync setup will do just fine and this is quite optimized. rsync has the ability to compare the checksums of the source and destination files and only copy a file when it changed. This saved a huge amount of time when only a very few files have changed since the last backup.
rsync also has the ability to delete files on the destination file system. So it really keeps a backup in sync. This would not work well for a boot device, as mentioned above, since it does not attempt to backup the boot setup. But frankly, if your boot drive fails, you should just install the next version of Linux and then restore your backups using rsync the other way around.
There are many other backup systems, some free some not. It's up to you to look around further. For a few files, you can even consider using cp or scp. For you main system, with your /home and /var directories, you probably want to consider RAID1 instead. That can be done in software (with Linux, at least) or with the hardware. Watch out, though, hardware RAID is often not compatible between different version of the hardware (Even from the same brand) so you may lose your data if the hardware fails and needs to be completely replaced.
One more thing: if you are using encrypted partitions, 100% make backupS (<- 'S' a.k.a. multiple backups). If you lose your key, the data is lost even if the drive is not failing. Without having backups (which can each be encrypted), you'd have no possible way of rescuing your data.
Recent Posts on The Linux Page: