A site for solving at least some of your technical problems...

Running Parted to Resize your Virtualbox Drive (including fixed drives)
Submitted by Alexis Wilke on Wed, 11/20/2019 - 02:00
Problem: Small Partition in your Virtualbox Drive
By defauilt Virtuabox often tells you to setup your partition size to 20Gb. This is actually really small if you are to do some serious work with your virtualbox especially since the OS is likely to use about half of it on install.
But if you don't pay attention, chances are you end up with a tiny partition which you may wish you could exstend later...
Note that in many cases, this operation is not possible. For example, VirtualBox does not give us the ability to change the size of a fixed disk. Unfortunate because non-fixed do not work well (read at all with LVM) so I usually use Fixed Disks.
See details here: https://forums.virtualbox.org/viewtopic.php?f=24&t=50661
Solution 1: Change the Size of your Partition
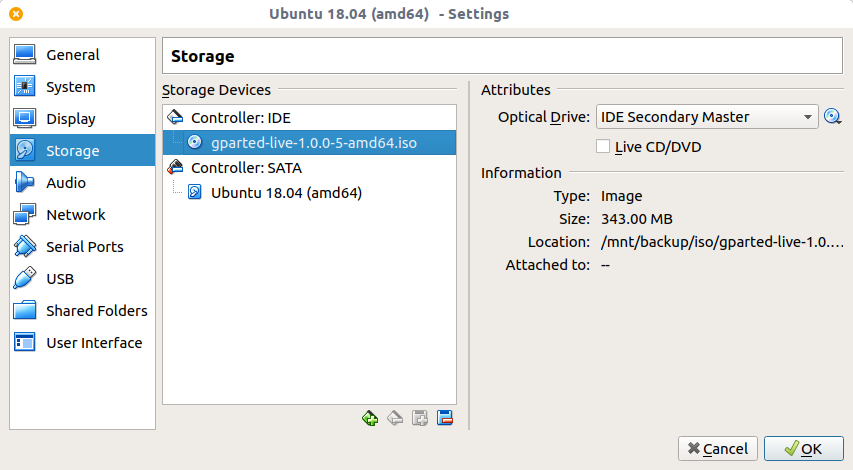
First you need to resize the file. This can be done from the interface. Click on the Tools button at the top-right and search for your Hard drive. Click on it. At the bottom of the list, you see details about that hard drive including its size. You can use the slider to change the size to what you want it to be. Note that only changes the size of the file, not the size of the partitions on the disk.
To manage the partitions, you want to run gparted and resize the drive to your liking. Then change the partitions with the virtual partition commands (hopefully you used LVM or a similar file system which can be updated with a few commands after a reboot...)
In order to run gparted, though, you need to have Gnome running and also you can't resize a partition which is currently mounted. To resolve this problem we use the GParted Live CD. You download that from the official gparted website and then install it in your CD IDE controller (see picture above). Finally, boot the computer and it you'll be able to start gparted. There should be no problem booting on gparted once you have the CD.
On a main server or desktop computer, you want to create a CD or if you do not have a CD Drive (like many now a day!) use a USB stick. Place the ISO on one of those media and reboot your computer. Now you'll have access to the partitions and be given permissions to tweak their size.
Note that shrinking a partition is possible, it's just going to tell you that it's dangerous. However, just be aware that it takes time to reduce the size of a partition. The system is going to rewrite many blocks so they remain on the partition as expected by your OS. Be very patient. Growing a partition, however, is nearly instantaneous.
See also: https://linuxhint.com/increase-virtualbox-disk-size/
Solution 2: Create a Second Drive
Another solution is to add another drive. You could then install your /home folder on that drive and have it automatically mounted on boot. Personally, I perfer to have a single drive, but this can be very useful if you have many OSes and you want to have your /home folder in one place.
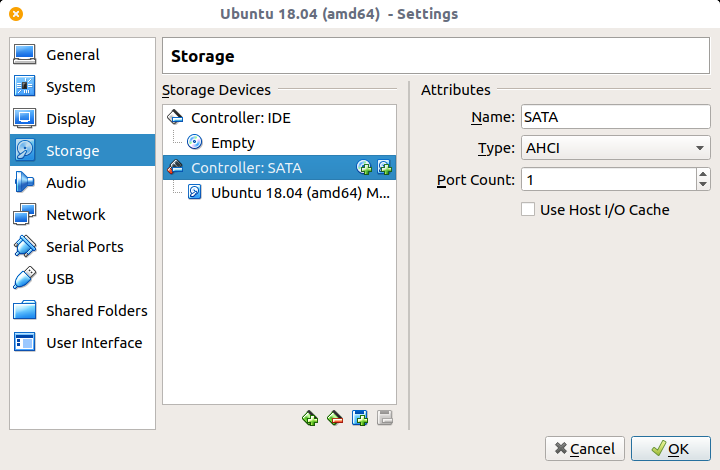
Click on Settings, then Storage, here click on the small HDD+ icon
then following instructions.
Solution 3: Resizing Anyway
S3.1: Using GParted
You can do this using GParted all the way:
1) create a bigger drive and add it to your SATA 0 controller
2) boot on a Live Version of GParted and
3) from that Linux OS, copy your small drive on the new bigger drive using the dd command as shown below (see S3.2: From the VM).
4) Once the copy is done, restart GParted so it detects the new drive properly. You will probably need to let GParted "Fix" the new drive (whatever it thinks needs to be fixed). Then go to your new drive (i.a. /dev/hdb) and right click on the partition to resize it to the end of your drive. Done!
5) Make sure to shutdown GParted, eject that CD, remove the old boot drive, and finally move the new drive to SATA slot 0. In this case, on the reboot, you should have no problems since the existing boot drive was not mounted, so nothing will have changed.
For more details see the next section which explains how to do the copy with dd and resize with GParted.
S3.2: From the VM
If you still want to resize but you create a disk with a format which does not allow it, you'll have to create a new drive, intall it in your VM and start the VM.
Once at a prompt, run the dd command to copy your exising drive to the new larger drive. We'll fix the partitions later with gparted as in Solution 1 and then remove your old drive and make the new drive the boot drive.
sudo dd bs=512 if=/dev/sda of=/dev/sdb
If you know the exact size of your device (/dev/sda in my example) you can also specify that on the command line. If you don't, the command will generate an error once the end of /dev/sda is reached.
PLEASE MAKE SURE TO USE THE CORRECT DISK NAMES. THIS COMMAND IS DESTRUCTIVE.
The copy is likely going to take some time, even for a 10Gb hard drive... I recommand that you use the size of 512 to make sure that all the sectors get copied even if that means the copy takes longer.
When you reboot, after swapping the drives, it is very likely that you'll get errors saying that the file system is corrupted. This is because while doing the copy, the system wrote data to your source file system (/dev/sda) and those changes did not make it to the destination (/dev/sdb). At least I assume that you were not running important software while doing the copy. Actually, you should stop all your services especially databases, but anything you have running should be stopped while running the dd command.
To fix the problems, create this one file and reboot again:
sudo touch /forcefsck
It will correct whatever is wrong and you won't see the errors anymore. This often means it will delete a file or two, most certainly files that the OS created but did not complete right around the time dd copied those blocks. If you had nothing running, these are likely things such as logs, which should not be too important. Since ext4fs is a journaled based file system, it is likely to recover everything (there are copies of your files in the journal).
If it completely fails, note that you still have your old drive and can attemp the dd command again. This time make really sure you stopped all the services...
Recent Posts on The Linux Page:
Re: Running Parted to Resize your Virtualbox Drive ...
Many thanks for your useful recommendation to create a new disk and copy everything to it. This way I could increase my Ubuntu partition (and get one with a fixed size). However, after copying my disk with:
sudo dd bs=512 if=/dev/sda of=/dev/sdb
it became absolutely impossible to boot, even on the previous disk
(there was a message to manually perform fsck) !
HOST SYSTEM:
Windows 10 Pro ×64 (20H2)
GUEST SYSTEM:
Ubuntu 20 (×64)
PROBLEM:
On this Ubuntu version the command sudo touch /forcefsck doesn't work anymore. No other Linux command worked to "repair" the disk either (I tried a lot of hints from the internet). Assigning the "boot" name to the new partition may be necessary, but didn't help either (choose partition table type = MSDOS, too).
In particular, it didn't matter whether booting from the .vdi file or from the gparted ISO disk: both ways the enlarged size was not recognized !
SOLUTION:
I booted again from the gparted ISO disk with both virtual disks attached and wondered that the new disk's partition size was just the size of my former smaller disk. Thus, I enlarged the partition to its full size … and booting from both vdi disks worked again. I could disconnect the former too small partition.
COMMENTS:
It seems that the command sudo dd alters the partition size so that it becomes invalid and hinders the booting process ! One has to resize with gparted just afterwards.
WHERE IS THE BUG ?
Clearly the problem arises because even the newest version of VirtualBox (6.1.18) can increase the potential maximal size of dynamically allocated disks but isn't able to increase the size of the .vdi file itself. Obviously, Ubuntu ist also incapable to do that (altering its own boot partition within the Windows host system).
NOTE:
On my many trials, only once gparted recognized "normally" the increased size of the dynamic partition (no idea why, I did nothing different) and I could then increase the partition size. However, this led to a myriad of i/o errors and I had to go back to a previous snapshot ! Copying the partition to a new disk seems to be THE ONLY WORK-AROUND.