A site for solving at least some of your technical problems...
Enlarge a virtual hard drive used in your Linux virtual machine manager
I created a disk for my WinXP that I run on my virtual machine. This was my first Windows install and when creating the drive, the system used the wrong size. I did not notice until the whole installation was done. So... I got a hard drive of 8Gb which was not really large enough since installing all of those things for XP, including some updates, I got at a little over 5Gb of data.
Since I wanted to install many other things such as MinGW, it was quite tight!
I looked around and found a page on Ubuntu Forums that explained out to do the job: How to resize Hard Drive in Virtualbox. It's quite a bit of rebooting, but once you get it all working, you get the large partition and it all works nicely.
New Hard Drive
So... first you need to create a new hard drive for the virtual machine.

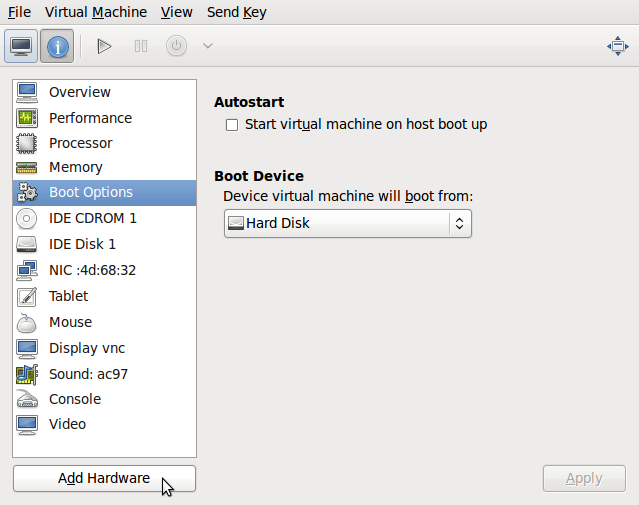
The screen shot shows you the Add Hardware button. Use that button to create your larger drive. This works the same way as you've done before when you create your virtual machine. Note that you create a new drive when the file name specified is a file that doesn't exist. Once a disk exists, the file won't be reformatted, it will just be used as is. Make sure to name it something that you will clearly show that this is the larger drive as you'll later have to select which disk is which.
Once the drive was created it should be added to your virtual machine. If it doesn't get added at the time you create a new disk, just click on Add Hardware again and select it.
Clone drive 1 to drive 2
The new drive should appear as IDE Disk 2. Now the Boot Options will NOT give you a way to boot on that drive (in case you were wondering) you'll have to remove the IDE Disk 1 at some point to boot on that new drive. At this time, we need to copy Disk 1 to Disk 2.
For that, use CloneZilla. Download the ISO from this SourceForge page:
https://sourceforge.net/projects/clonezilla/files/
Make sure to get the Live CD. That way you can insert it as CD-ROM and boot from it. Very easy to do!
Once you are finished with the download, click on IDE CDROM and then Browse to select that .iso file. This inserts the ISO in the CD-ROM drive of the virtual machine. Next click on Boot Options and select CD-ROM, make sure to click on Apply on that window, the boot options are not automatically saved...
Now start the virtual machine. It will boot that ISO so you can clone your hard drive.
Select the first option at the first prompt, select your language and keyboard map. At that point you receive a screen offering you start Clonezilla or a Shell. Hit enter to start the Clonezilla tool.
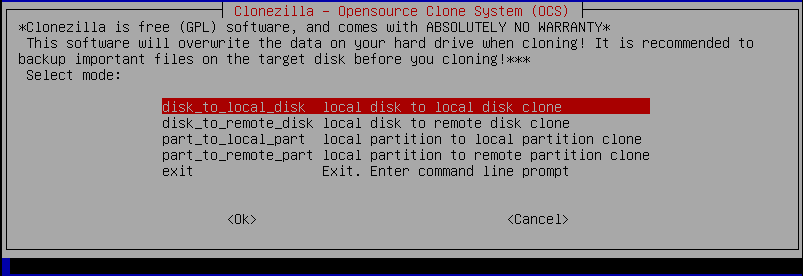
To copy your hard drives, you want to use the 2nd option (device-device -- work directly from a disk or partition to a disk or partition). At that point, the tool offers you to run in Beginner mode. Even though it is tempting, use the Expert mode because that gives you the option to remove the -g option. On more question before you select the drives: what you're exactly going to copy. Choose Local disk to local disk clone.

Now it gives you a choice of drives. Make sure you select the correct source and destination drive. By the way, if you do a mistake in any one of your selections, you'll have to reboot. I have not seen a way to go back and fix your selection. So be careful.
Next Clonezilla shows you a set of options. Make sure to REMOVE (uncheck) the GRUB option so that way you don't get GRUB for an NTFS file system!? The other options are properly set by default so leave them alone.
|
WARNING Expect the copy to take a LONG time. |
Once that is done, just say yes to everything else and finally turn off (shutdown) the virtual machine. That way you'll be able to move on to the next step.
Resize new drive
Now you probably want to remove the old drive from the list of hardware items. Simply click on it then click on Remove. Up to you, but to make sure that the copy worked, you may want to boot it. Make sure that your Boot Options says Hard Drive again. It may still say CD-ROM...
If it boots, then you're all good. But you will notice that the new hard disk is still the same good old size... This is because the partition size was not changed yet.
To resize the partition, go to SourceForge again and download gparted:
https://sourceforge.net/projects/gparted/
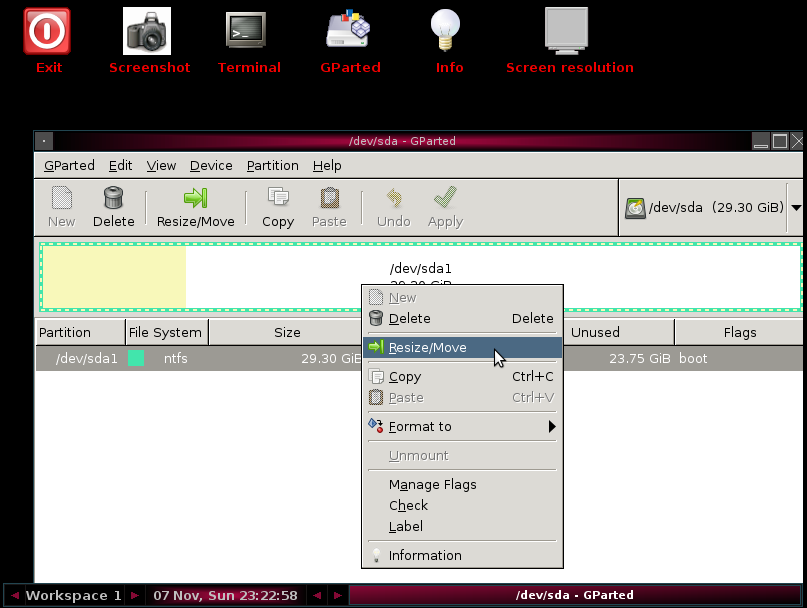
The gparted tool is graphical using X -Windows. More or less, click Enter 3 or 4 times until you see the following window:

Here right click on the partition to resize and select Resize/Move. In there put the new size. It should be self explanatory.
Once you are satisfied with the with your changes, click on the Apply button at the top. This will save your changes to the hard drive.
The partition is now the right size, click on the Exit button and shutdown your machine. You probably want to quit cleanly each time (do a clean shutdown) to make sure that everything is saved to your hard drive before you turn off your virtual machine.
Reboot Windows
The reboot after the gparted changes will generate a checkdisk. That's normal. That will fix the disk partition to work with the new larger size. More or less, it allows MS-Windows to change a few more bits on your hard drive to fall in love with your drive.
Recent Posts on The Linux Page:
